For those of you who want to root your OnePlus One (Why root? See Why Root Android?) to run rooted apps or want to install a custom ROM, here’s a step-by-step tutorial guide you can follow for all Windows, Mac, and Linux computers. Rooting the OnePlus One requires the user to unlock the bootloader. Unlocking bootloader will ERASE EVERYTHING ON YOUR PHONE, so make a backup of everything including your personal photos, videos, etc beforehand! YOU’VE BEEN WARNED!!! Will rooting OnePlus One void my warranty? Technically yes, but you can unroot/unbrick completely back to 100% stock so you can always unvoid warranty. So, if you have a Window, Mac OS X, or Linux (like Ubuntu) computer, let’s go ahead and root this bad boy! Before we begin, you can also download all the files you need here for all Windows, Mac OSX, and Linux/Ubuntu: Download:
Step 1. First power off your OnePlus One, then hold down Volume Up and Power buttons together for about 3 seconds. 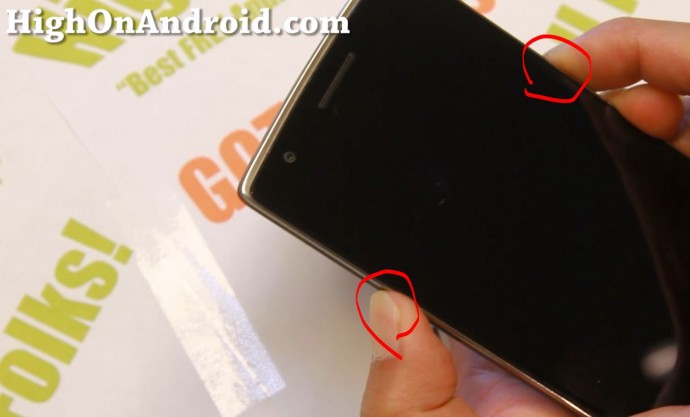 When you see “fastboot mode” with CyanogenMod logo, let go of both buttons.
 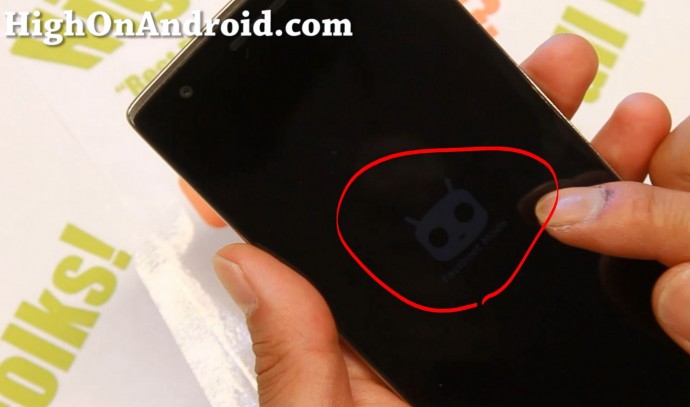 Then connect a micro-USB cable from your computer to your OnePlus One.
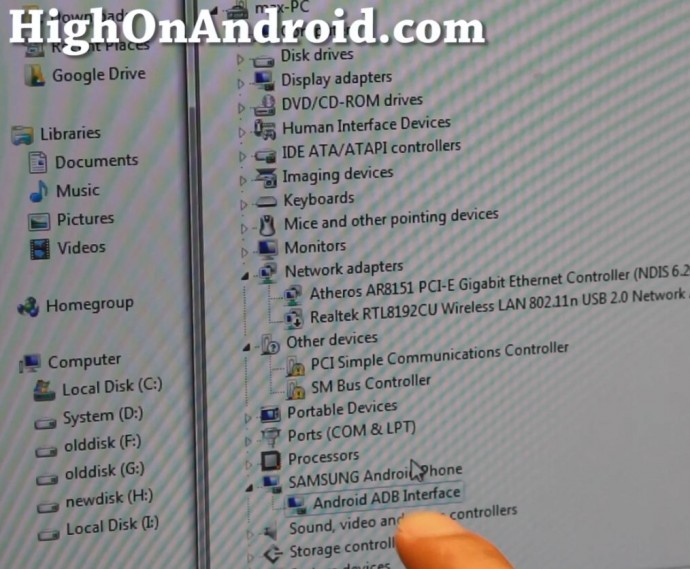
 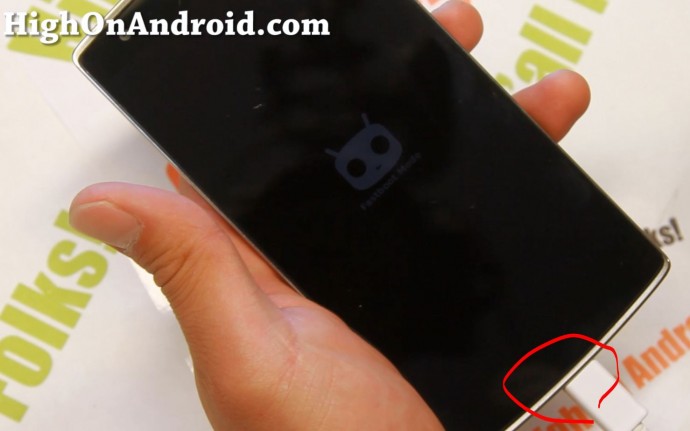 Step 2. For Mac or Linux, skip to Step 3 as you do not need to install drivers. For Windows, open Device Manager (go to Control Panel->Hardware & Sound->Device Manager). If you have previously installed ADB drivers for other phones like Nexus 4 or Nexus 5, you may see “Android ADB Interface”. If you see that, skip to Step 3. However, if you don’t see that and you see “Android” with an exclamation mark, follow our video tutorial and install ADB drivers. Download: Download ADB Drivers
 Step 3. Next, you will need fastboot files. You don’t need to download the whole Android SDK (which can take hours) to get this, just download fastboot.zip and unzip, you should get a folder called fastboot with all the files you need for Windows, Mac, and Linux. Download: Download fastboot.zip Also you need to download TWRP or CWM recovery image and put it in the same folder as fastboot. Download: Download TWRP or CWM Recovery for OnePlus One
 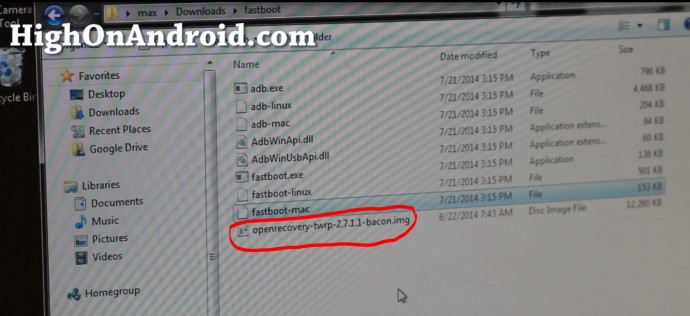 Step 4. Next, open up a command prompt (type “cmd” in Windows search bar) or terminal for Mac/Linux. WARNING: This is where we unlock the bootloader on the OnePlus One. By doing this step, it will ERASE EVERYTHING ON YOUR PHONE!!! Then type: For Windows:
 cd Download cd fastboot fastboot oem unlock For Mac OSX: cd Download cd fastboot chmod 755 * ./fastboot-mac oem unlock For Linux/Ubuntu: cd Download cd fastboot chmod 755 * sudo ./fastboot-linux oem unlock 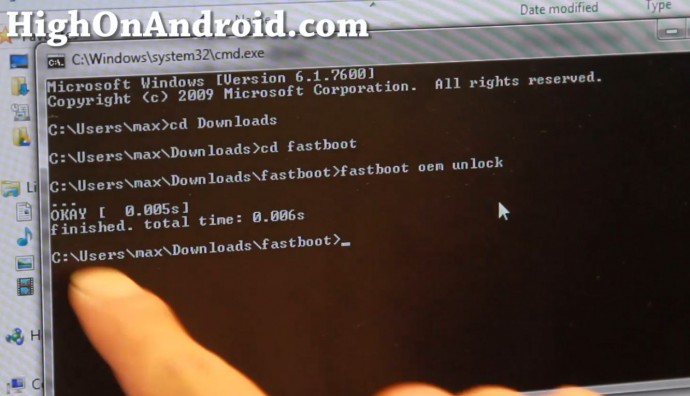 Step 5. Your phone will reboot couple times and reboot. Once rebooted, simply sign in to your account then go to Settings->About Phone and hit the “Build Number” 5 times until it says “You have enabled development settings”.
 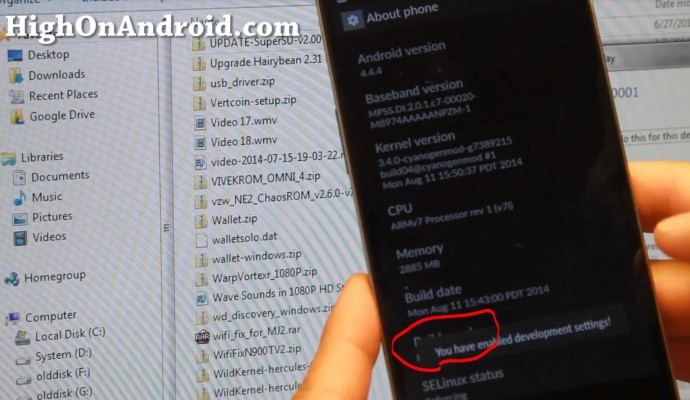 Step 6. Then hit the back button once, you should see a new menu option called “Developer options”, press on that.
 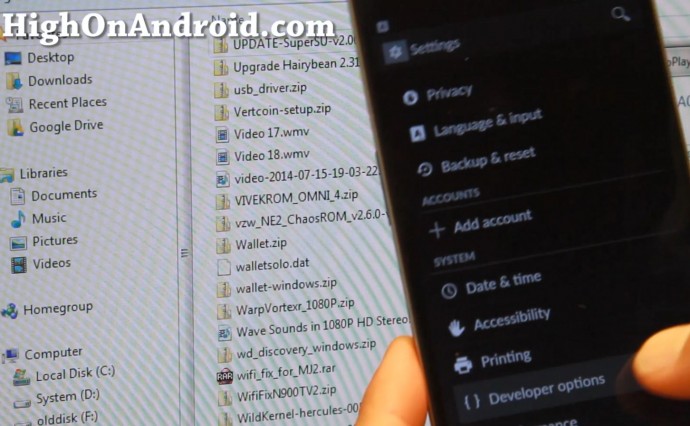 And make sure “Update CM recovery” is checked OFF. This is so your phone won’t try to re-install stock recovery over the custom CWM/TWRP recovery we will be installing. Besides, we no longer need a stock recovery once rooted, CWM/TWRP recovery will handle everything for us.
 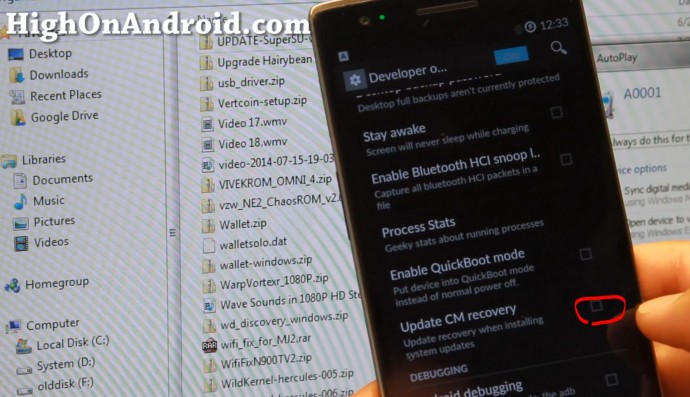 Step 7. Download and copy SuperSU zip file onto your OnePlus One. Download: Download SuperSU zip file
 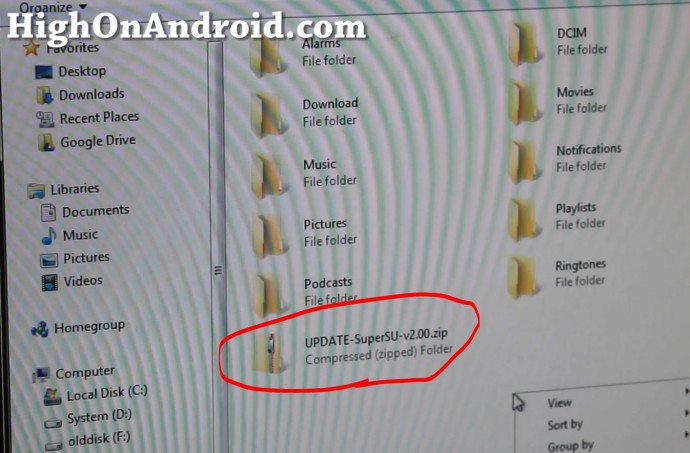 Step 8. Put your phone into fastboot mode like you did in Step 1 and connect micro-USB cable to your OnePlus One.
 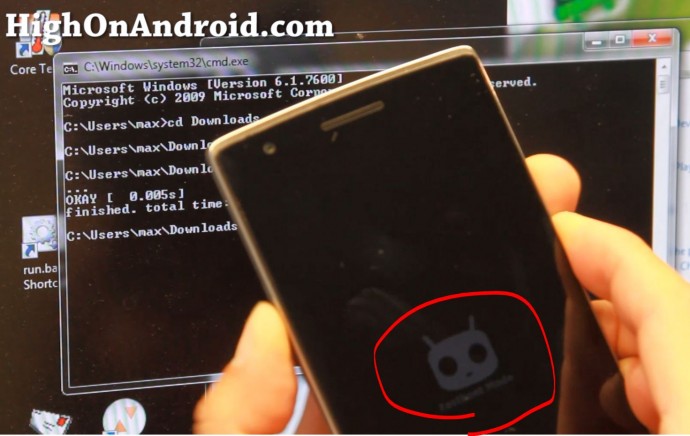 Step 9. Then type: (You can also copy & paste duh!) For Windows:
 fastboot flash recovery openrecovery-twrp-2.7.1.1-bacon.img fastboot erase cache For Mac OSX: ./fastboot-mac flash recovery openrecovery-twrp-2.7.1.1-bacon.img ./fastboot-mac erase cache For Linux/Ubuntu: sudo ./fastboot-linux flash recovery openrecovery-twrp-2.7.1.1-bacon.img sudo ./fastboot-linux erase cache Also you can replace the file name “openrecovery-twrp-2.7.1.1-bacon.img” with the recovery image you want to use (e.g. CWM Recovery image) but I do recommend TWRP Recovery as it’s more versatile. You can also use OTG Flash Drives with TWRP which can be handy in leaving all of your large backup ROMs separate from your phone’s storage. 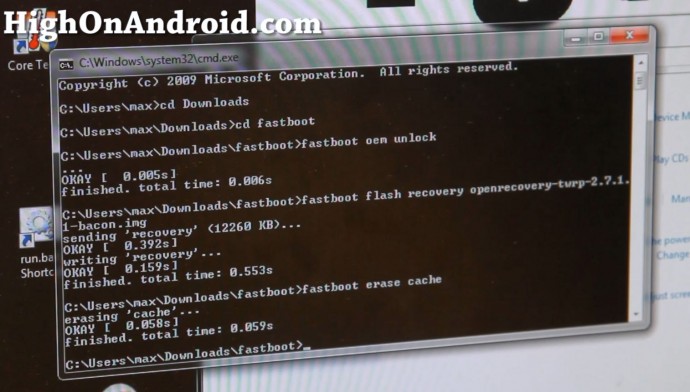 Step 10. Unplug your micro-USB cable as we don’t need it anymore. Then hold down Volume Down and Power buttons together.
  When your phone reset and you see OnePlus One logo, let go of both buttons.
 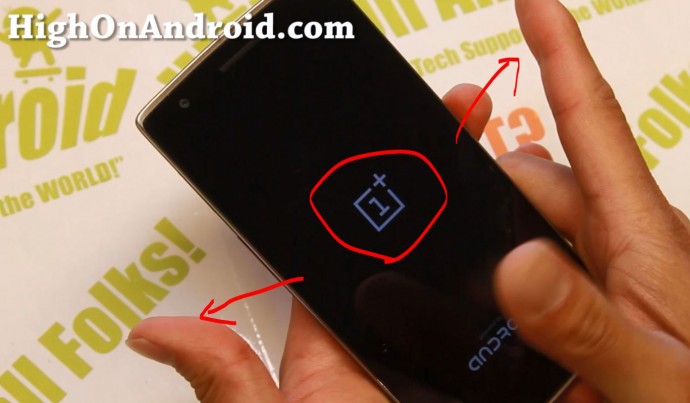 Step 11. You should now see TWRP Recovery, choose “Install”.
 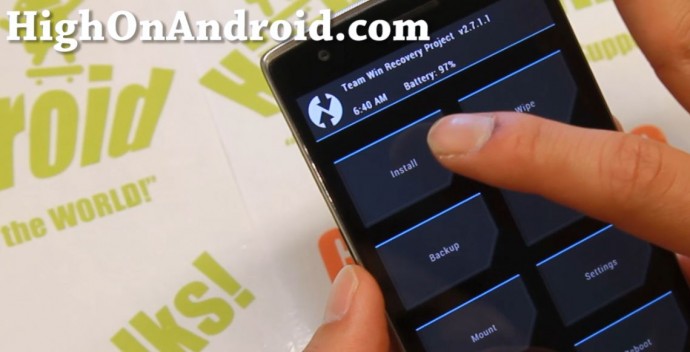 Then browse your storage and find the SuperSU zip file you copied over earlier and install it.
 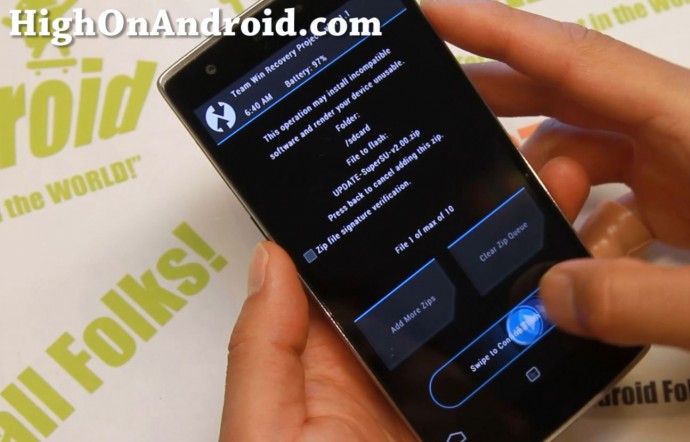 Step 12. Reboot your OnePlus One and you should find SuperSU app. Open the app and if you don’t get any errors, your OnePlus One has been fully rooted. Also if it asks you to update binaries, say “yes”.
 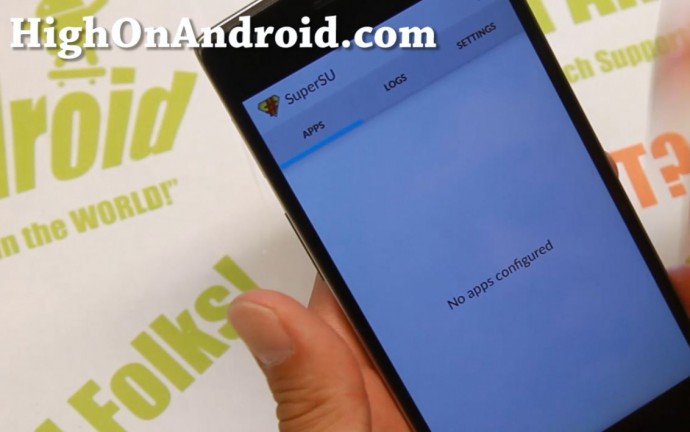 Step 13. You can install and open a rooted app like Titanium Backup app to verify you have full root. You should see a Superuser request window. Congratulations! You’ve rooted your OnePlus One in “High On Android” style. Pat yourself on the back and go show off to all your friends that your OnePlus One is better than their phone.
  Q&A Q: I have a question! A: Please post your questions below in the comments box. Q: How can I thank you for your tutorial? A: I don’t take donations but if you could PLEASE subscribe to my Zedomax YouTube channel, that would help me greatly and thank you! Credits – +ChainFire for awesome SuperSU, XDA user Acer73 for Philz CWM, and TWRP for TWRP Recovery!
OnePlus One E-Mail Newsletter
Want to receive weekly updates on OnePlus One stuff ONLY including ROM of the Week and tips/tricks? (This is different e-mail list from our regular HighOnAndroid newsletter.) Sign up for our OnePlus One weekly newsletter here.
Have a question?
Please post all your questions at the new Android Rehab Center at HighOnAndroid Forum, thank you for understanding!Join the HighOnAndroid VIP Fans List for free help from Max and discounts on Android accessories.